Knitted scarves are beautiful and soft, but a crocheter wants to crochet! Crochet is faster than knitting, and is great for producing nice chunky stitches. But too often, crochet scarves turn out awkward and stiff, lacking the nice drape and softness of knit. Determined to make a warm, soft, beautiful crochet scarf, I set out on my quest to find the perfect way to crochet a scarf.
I experimented with a lot of stitches to find one that would look nice (on both sides of the piece, because who wants a one-sided scarf?), would feel nice (not too dense, and with soft and smooth stitches), and that would work up quickly.
What I finally settled on is this beautiful ribbed variation of a half double crochet stitch. I love the look and feel of scarves made using this stitch.
Here’s how it’s done:
Start with a row of half double crochet (hdc).

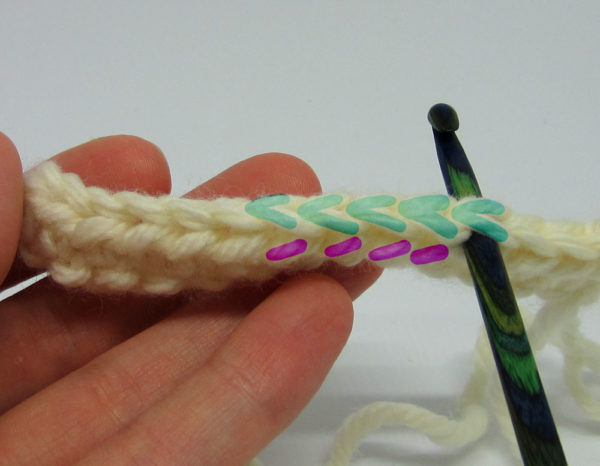
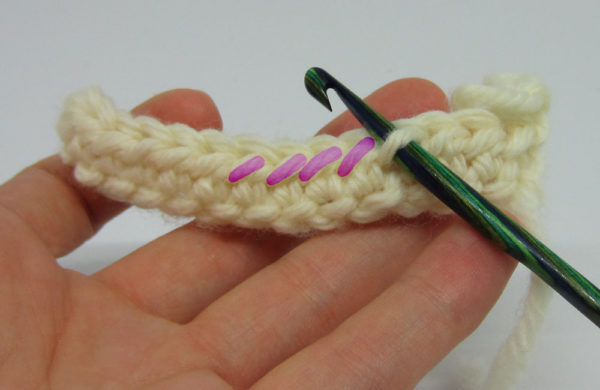
The following rows will all be worked in the ribbed hdc variation. The only difference between a normal hdc and the ribbed variation is with where you insert your hook. Hdc stitches create an extra horizontal loop below the ‘V’ where you would normally insert your hook. To create hdc ribbing, you will insert the hook through that extra loop instead of through the V.
Some pictures to help:
The image below shows the hook inserted through the V, like a normal hdc. This is not how you will complete this stitch.

The next image shows the hook inserted in the horizontal loop. Continue hdc through these horizontal loops, and you will create the ribbing, it’s that easy!

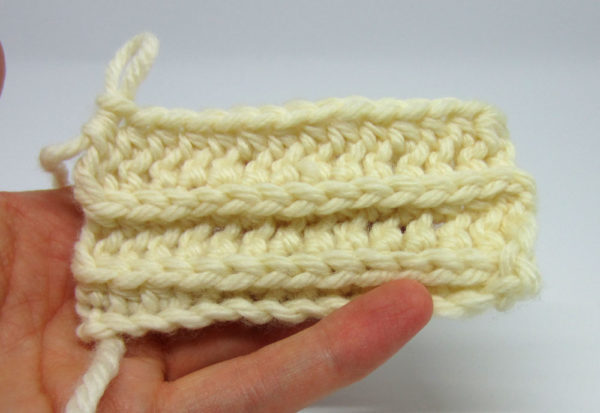
You won’t really start to see the ribbing effect until after a few rows, and it tends to look strange on a short piece (like the swatch below). So don’t give up on it too soon! It really is a simple and beautiful stitch, especially for a scarf.

Making the Scarf
Once you have the hang of the ribbed half double crochet stitch, making a scarf is a lot of fun. The scarf is worked up lengthwise, so the length of the starting chain determines the length of your scarf, and the number of rows determines the scarf’s width. I’ll walk you through how to figure out how long your starting chain should be.
**If you don’t want to calculate and don’t care about the exact length of your scarf, just make a chain wide enough that you can hold it in both hands and stretch your arms wide. Then, add 10-20 more stitches, and start crocheting your scarf!
Yarn
You can use any size yarn, but I recommend not using special fuzzy yarns because they will hide the ribbing – this stitch looks best with a standard yarn. I’ve used cotton, wool, acrylic, and more, and all have worked well, just not fuzzy yarns.
Hook
I recommend a hook that is a size smaller than you would typically use with your yarn – the ribbing turns out best when the stitches aren’t too loose.
First step: Crochet a swatch
The best way to calculate how many stitches you will need is to start by crocheting a swatch. To create a swatch, chain 15 stitches. Complete 5 rows of the half double crochet ribbed stitch.

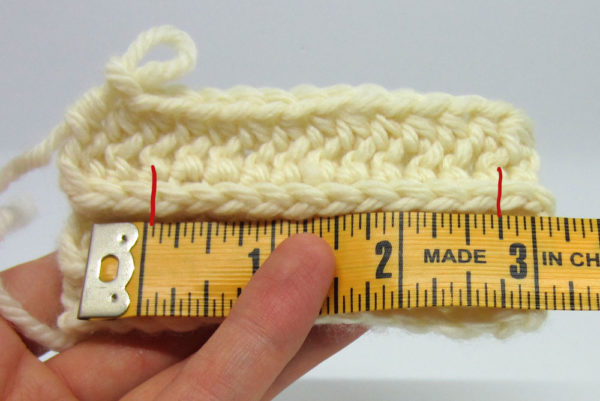
Measure the 10 stitches in the middle of the swatch and write this measurement down. You will use it to calculate the number of stitches needed to complete the scarf.

The swatch I created measures about 2.75 in. for each 10 stitches.
Determine the length of the chain
Now we need to use our swatch measurement to determine how many chains to make to get the desired scarf length. Between 6-8 feet (183-244 cm) is usually a good length. I’ll shoot for 6 feet for this example. First, I’ll convert that to inches. There are 12 inches in a foot, so my 6 foot scarf will be 72 inches.
So how many 10-stitch segments does it take to reach 72 inches? Here’s a simple formula:
Scarf Length / Swatch Measurement = X
Plugging in my numbers I get:
72 in. / 2.75 in. = approx. 26
So I will need 26 10-stitch segments to complete the scarf. In other words, I will need 260 stitches.
The width
Just keep adding rows until you like the width of your scarf. Not sure what width a scarf should be? Between 5 – 7 inches (12-18 cm) is usually a good standard size.
And you’re done! No finishing off needed.
I love using this stitch for scarves, but it’s also beautiful for blankets. I’m sure there are other applications as well, play around with it and let me know what you come up with! Also, if anything is unclear, feel free to ask for some help or clarification. Thanks for reading 🙂
Thank you for this. It’s working up wonderfully!
Can work better if its in YouTube do you have it
Hiya, love the look of this scarf! But what size crochet hook did you use? And what weight yarn?
Is it possible to have the directions. That is the only way I can do things. I’m a visual learner and would appreciate if if you could send them.
Thanks,
Terry
I would love to make this scarf for the homeless men that our group does.
Della
I’m going to try this pattern. Thanks !
I am interested in making this scarf but do not know how much yarn I will need. What kind of yarn and how much does it need?
Just what I was looking for! Will be making two of them for a benefit raffle.
If you can, please, please tell me where to find this pattern or email it to me. I absolutely love this ribbing!
Hi Kathy, there’s actually no ‘pattern’ per se. After experimenting with different stitches, I found this one which I love, and I make scarves of different sizes with it. My only rule of thumb is to use a smaller hook than normal because I think this stitch looks better with snug stitches. The rest is up to your preference – which length and width you want. I often start with a chain that is a few inches longer than the length of my arms stretched out. That usually works well. You can also look through the comments. Many people have asked the same question as you, and others have responded with stitch counts they used for their scarves. I would like to put together an actual pattern, but for now it’s just this stitch tutorial. Hope that’s at least a little helpful 🙂
I use this same pattern for the ear protectors that match scarves. Sometimes I crochet flowers for the little girls scarves
I would love to know how you make the ear warmers. Do you have a pattern online or anything? Thanks you
how do I get the instructions? I really like this pattern. I’m a beginner.
How do you get the pattern? Number of stitches, yarn needed, hook size.
Is it possible to have the directions to this beautiful scarf. I would love to make it for a dear friend for her birthday.
Thank yoy
I’m thinking I’ll do this using all my left over yarns,colorful,novelty,etc,ext.
Love this design! I’m a beginner and was looking for a simple scarf to crochet for my husband. There’s a great tutorial on how to do the half double crochet foundation chain here and then the rest of the pattern makes sense!
http://www.mooglyblog.com/foundation-half-double-crochet/ (and tutorials on just about everything else you need to get started).
[…] you want. I used the Crochet Ribbed Scarf pattern by Jenn Ozkan. You can find the instructions here. I made mine using Bernat Satin yarn in Admiral (blue) and Bordeaux (red), alternating them ever […]
I use this stitch to make hats as well as many other things. I love this stitch.
I used this stitch to make hats which turn out very nice. I love this stitch for different things.
I did it! It IS easy, and it’s just like she showed in the pics!!!!! I did a sample with bright yellow yarn and a size 8mm hook. I also did Hdc no chain foundation. Your first crochet row starts out with the stitch. Look at the pic closely. See where you would normally put your hook for the “usual” hdc? Make believe you are going to insert your hook there but stop yourself……Now look down right under your hook, right under the stitch your are ready to go into. There is a little “line” of yarn laying there. THAT is what you insert your hook into and make the hdc stitch. Go to the next stitch. Look at where you would put your hook normally……stop!! look straight down under those loops. There is the little line of yarn…..put your hook under that line and make a hdc crochet! Look closely again at the pics. See the purple little line under the cream stitch? Thats it!!! THAT’S where you insert your hook!!! just like the hook in the picture!!! I am an almost beginning crocheter. I have made simple dishcloths, and dog blankies for the shelter and rescue dogs. This tutorial is just fine, well done in fact…..you just have to think about it first. I would probably use an I (5.5mm) or J(6mm) hook. Next I’m going to try it holding two strands of yarn together. I’m coming to this post late, and no one will probably ever see it, but the directions ARE clear and EASY and I am GRATEFUL for the sharing of the pattern!!!!!
I’m so glad I found your tutorial for this scarf! The ribbing comes out sooooooooo much nicer than just going into the back stitch, and the directions were very easy to follow! Even though spring/summer is right around the corner I will definitely be making another scarf very, very soon! Thank you so much for sharing!
Will you send me the whole instructions, I will send this to my daughter and granddaughter. Thank you.
Could I have instruction please….
Thanks
I use half dc to make infinity scarfs using Lion Hometown Chunky yarn which has a beautiful drape when finished. I make the scarf like you would a regular scarf (ch 90 -100) then twist once and bind the ends together. Looks great!
I just finished my scarf and it looks great. I used some Hobby Lobby yarn called Aurora Borealis, which has lots of colors. I am just learning to crochet, and I always have trouble on my first row into the chain – it wants to twist and I lose track of where I’m supposed to put the hook, but once I got that row finished, it was super easy! Thanks for the instructions. Here’s a link to a photo. http://www.justwant2knit.blogspot.com
The instructions were just fine. Thank you for the free pattern. It’s exactly what I needed!
This looks great. I have made infinity scarves using spiral technique and they looked great, but I think I like this look better. I’ve also found that doing my first row after the foundation chain in the back “bump” is really pretty too but quite time-consuming! Thanks for sharing this, and I think the instructions were perfectly clear and this is my next project.
Anne
Could you convert this pattern into an infinity scarf or cowl?
Boy! It would be nice if you actually listed the instructions instead of everyone trying to guess it!! The above instructions is not very good!
IS THIS SOMETHING THAT CAN BE WORN BY MEN? I HAVE LOOKED ALL OVER AND ONLY FOUND ONE PATTERN FOR A CROCHETED INFINITY SCARF FOR A MAN. I AM ON A BORROWED COMPUTER SO IF YOU COULD PLEASE EMAIL ME I WOULD APPRECIATE IT. THANK YOU SO MUCH