
Knitted scarves are beautiful and soft, but a crocheter wants to crochet! Crochet is faster than knitting, and is great for producing nice chunky stitches. But too often, crochet scarves turn out awkward and stiff, lacking the nice drape and softness of knit. Determined to make a warm, soft, beautiful crochet scarf, I set out on my quest to find the perfect way to crochet a scarf.
I experimented with a lot of stitches to find one that would look nice (on both sides of the piece, because who wants a one-sided scarf?), would feel nice (not too dense, and with soft and smooth stitches), and that would work up quickly.
What I finally settled on is this beautiful ribbed variation of a half double crochet stitch. I love the look and feel of scarves made using this stitch.
Here’s how it’s done:
Start with a row of half double crochet (hdc).

The following rows will all be worked in the ribbed hdc variation. The only difference between a normal hdc and the ribbed variation is with where you insert your hook. Hdc stitches create an extra horizontal loop below the ‘V’ where you would normally insert your hook. To create hdc ribbing, you will insert the hook through that extra loop instead of through the V.
Some pictures to help:
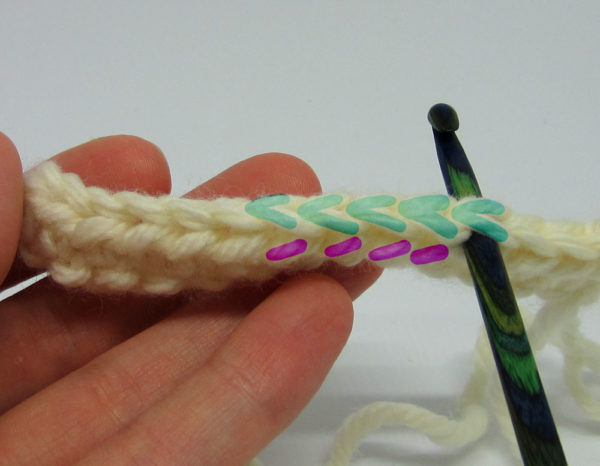
The image below shows the hook inserted through the V, like a normal hdc. This is not how you will complete this stitch.
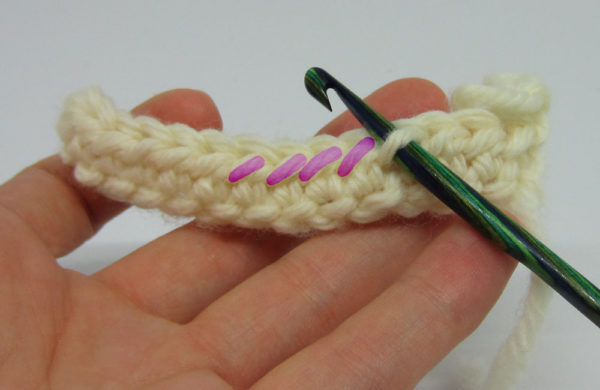
The next image shows the hook inserted in the horizontal loop. Continue hdc through these horizontal loops, and you will create the ribbing, it’s that easy!
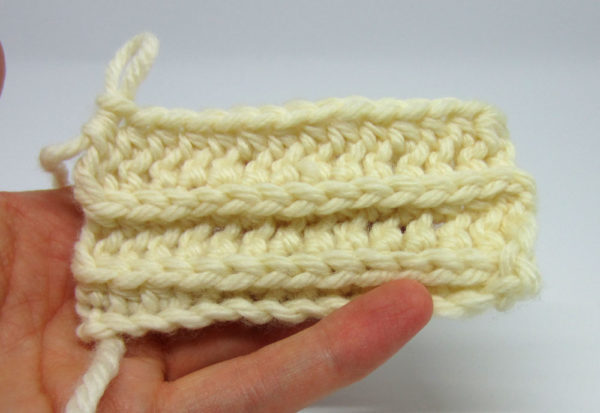
You won’t really start to see the ribbing effect until after a few rows, and it tends to look strange on a short piece (like the swatch below). So don’t give up on it too soon! It really is a simple and beautiful stitch, especially for a scarf.
Making the Scarf
Once you have the hang of the ribbed half double crochet stitch, making a scarf is a lot of fun. The scarf is worked up lengthwise, so the length of the starting chain determines the length of your scarf, and the number of rows determines the scarf’s width. I’ll walk you through how to figure out how long your starting chain should be.
**If you don’t want to calculate and don’t care about the exact length of your scarf, just make a chain wide enough that you can hold it in both hands and stretch your arms wide. Then, add 10-20 more stitches, and start crocheting your scarf!
Yarn
You can use any size yarn, but I recommend not using special fuzzy yarns because they will hide the ribbing – this stitch looks best with a standard yarn. I’ve used cotton, wool, acrylic, and more, and all have worked well, just not fuzzy yarns.
Hook
I recommend a hook that is a size smaller than you would typically use with your yarn – the ribbing turns out best when the stitches aren’t too loose.
First step: Crochet a swatch
The best way to calculate how many stitches you will need is to start by crocheting a swatch. To create a swatch, chain 15 stitches. Complete 5 rows of the half double crochet ribbed stitch.
Measure the 10 stitches in the middle of the swatch and write this measurement down. You will use it to calculate the number of stitches needed to complete the scarf.
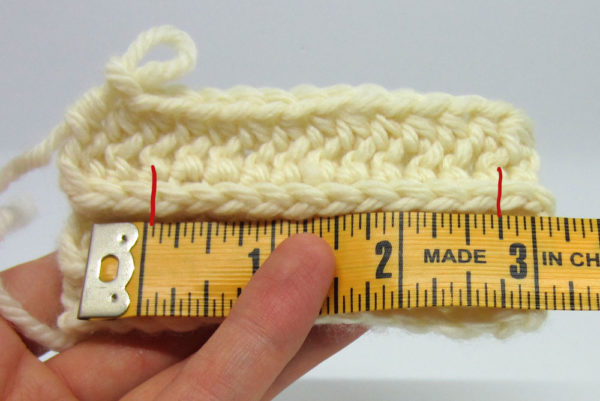
The swatch I created measures about 2.75 in. for each 10 stitches.
Determine the length of the chain
Now we need to use our swatch measurement to determine how many chains to make to get the desired scarf length. Between 6-8 feet (183-244 cm) is usually a good length. I’ll shoot for 6 feet for this example. First, I’ll convert that to inches. There are 12 inches in a foot, so my 6 foot scarf will be 72 inches.
So how many 10-stitch segments does it take to reach 72 inches? Here’s a simple formula:
Scarf Length / Swatch Measurement = X
Plugging in my numbers I get:
72 in. / 2.75 in. = approx. 26
So I will need 26 10-stitch segments to complete the scarf. In other words, I will need 260 stitches.
The width
Just keep adding rows until you like the width of your scarf. Not sure what width a scarf should be? Between 5 – 7 inches (12-18 cm) is usually a good standard size.
And you’re done! No finishing off needed.
I love using this stitch for scarves, but it’s also beautiful for blankets. I’m sure there are other applications as well, play around with it and let me know what you come up with! Also, if anything is unclear, feel free to ask for some help or clarification. Thanks for reading 🙂
How many yards in general would one need to make an 80 inch scarf of this pattern?
Hi Gwenn, it’s been awhile since I’ve made a scarf, but if I remember right, I used a little over 100 grams (I’m not sure how many yards) of bukly yarn to create a smallish 6 foot scarf. It depends how wide you want the scarf to be. I’m guessing you will need at least 200 grams. But I’m not sure if I got that right… You might have to buy extra, and return any unused balls of yarn. A pain, I know :/ Good luck! I’d love to see the result 🙂
Does it matter if the ribbing goes left to right? I have coloured wools I need to Crochet in to it
I’m not sure I understand – are you crocheting left-handed, so it’s in the reverse direction? If so, no problem!.
Thank you for the easy to follow directions and free pattern!
Very well written, so easy to follow up
Jenn, I prefer making scarves by width rather than length. Do you see any problem with that? So far it seems to look fine. Love the stitch.
Hi Jan, you can definitely crochet by width, but the ribbing won’t have the same drape or visual effect. I hope it turns out well!
Thanks Jenn, I’ll let you know!
is it a two chain for the turning chain and does that count as a HDC
I actually just use 1 chain, and I do not count it as a HDC. Chain 1, turn, hdc in every hdc across.
I have been looking for a scarf pattern that could be used for a man or a woman and this fits the concept mainly because an acquaintance just lost her husband from a stroke and this will something that I don’t even have to count and can do it fast. This lady has a booth in a flea market and will help her by making scarfs for her to sell because she doesn’t have any income.
i wish you would make a video so i can watch and learn the stitches you are croteching would have been much easier.
Fantastic pattern! Thank you for sharing, I’m finally getting started with my test strip. Just a quick question, how would I add the fringe? I will be doing stripes in shades of grey. Yours are so neat.
Hi Salma, just replied to your convo on Etsy, I hope the scarf turns out great, I’d love to see the results!
I love how you’re always helping people I’m learning
Very nice
WONDERFUL, WONDERFUL!! I needed to figure out how many stitches for a scarf and there you were! THANK YOU!!
This is an excellent tutorial. The details help one to understand the reasons for what one is doing.
Thank you so much for this free tutorial.
Using red heart super saver verigated 100% acrylic. What size hook should I use.
Thanx
I’d say try 1 hook size smaller than what the yarn label recommends. But different yarn/hook combinations give different results, so if it seems like it’s too tight and dense, use a larger hook, and if its too loose and sloppy, use a smaller hook.
Disregard I think I know what to do.
I’m a beginner and confused by the first stitches. What am I missing?
Here is the tutorial in video format for you to follow along. Please see:
https://www.youtube.com/watch?v=4n0n0EQaMHU
Hi, I am in the process of trying this out and I really like the clean look of the ribbing. My question is, on the oatmeal-colored scarf pictured on Ravelry, did you add a border to the ends? It kind of looks that way to me, and I found my ends came out a bit raggedy so I probably would do something with a border on the ends or possibly all the way around. Thanks for any help you can give!
I’m not sure about the oatmeal scarf because someone else added my tutorial to Ravelry, so that wasn’t me, but I do not add any border to my scarves. As long as you begin and end every row consistently, it should turn out pretty neatly. You can attach fringe on the ends to hide any imperfections. Hope that helps!
To lovescats I encourage you to read the whole page again. The pattern is not given as “row 1, row 2”, but rather guidance is given 1st in a great picture showing how to do the stitch used. Then Jenn gives great instructions for us to decide how many stitches long to start our base chain/first row – – – do your swatch & then do the simple math for how many feet long you want the scarf to be! Then after making your first row that long of regular hdc, you turn at end & crochet all other rows in the ribbed hdc – or as it turns out another reader kindly posted above this stitch is also called the camel stitch! Best wishes. And Jenn – thanks so much for the free pattern – I love it!
Thanks Diane, I actually improved this page recently. I had gotten some similar but less direct comments to the one you are referring to, and although it’s kinda impolite to complain about a free tutorial I put together… I decided they were right and I could clarify further 🙂 Glad you like the revised version, hopefully others will too.
Which yarn did you use and how much yarn did it take to make the scarf for a 6 foot length.
So sorry for the late response. 200 grams of bulky weight wool is nearly enough. 300 grams (3 large balls/skeins) should definitely give you plenty for a cozy 6 foot scarf.
I’d like to know how much yarn is needed and which yarn you used.
Thanks a lot for this. I am a knitter but want to try something different. I usually don’t like the look of crochet but this is attractive. I plan to start one today!
This is a new pattern for me, so I think I’ll be making some pretty hotpads to start with. And I was thinking earlier in the day that it’s time I started on some stocking stuffers. Perfect!
This pattern is excellent, thank you for sharing.
This stitch is also called the camel stitch. Try Ravelry.com or other crochet crowd.com for additional information. Great idea!
I have seen the camel stitch but the one I saw was single crochet & working into the back “hump” rather than from the front. I had a hard time with that technique (finding the hump) so I am happy I found this version.
I have a hard time with the ‘back loop’ technique too – it takes longer than this ‘front loop’ version of the stitch because the hook doesnt slide into the back loop as naturally, and I love how this version looks like knitting! I like using both stitches though, they both turn out much softer and drapier than regular crochet 🙂
Ravelry says “free pattern”. WHERE IS THE PATTERN? Or, at least, how many chains for a scarf for an adult woman? PLEASE