
Knitted scarves are beautiful and soft, but a crocheter wants to crochet! Crochet is faster than knitting, and is great for producing nice chunky stitches. But too often, crochet scarves turn out awkward and stiff, lacking the nice drape and softness of knit. Determined to make a warm, soft, beautiful crochet scarf, I set out on my quest to find the perfect way to crochet a scarf.
I experimented with a lot of stitches to find one that would look nice (on both sides of the piece, because who wants a one-sided scarf?), would feel nice (not too dense, and with soft and smooth stitches), and that would work up quickly.
What I finally settled on is this beautiful ribbed variation of a half double crochet stitch. I love the look and feel of scarves made using this stitch.
Here’s how it’s done:
Start with a row of half double crochet (hdc).

The following rows will all be worked in the ribbed hdc variation. The only difference between a normal hdc and the ribbed variation is with where you insert your hook. Hdc stitches create an extra horizontal loop below the ‘V’ where you would normally insert your hook. To create hdc ribbing, you will insert the hook through that extra loop instead of through the V.
Some pictures to help:
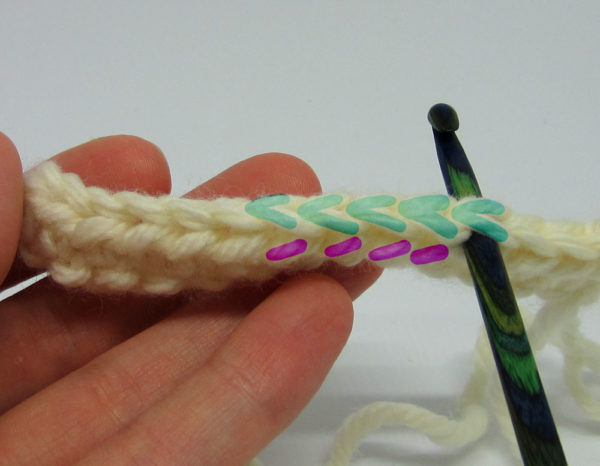
The image below shows the hook inserted through the V, like a normal hdc. This is not how you will complete this stitch.
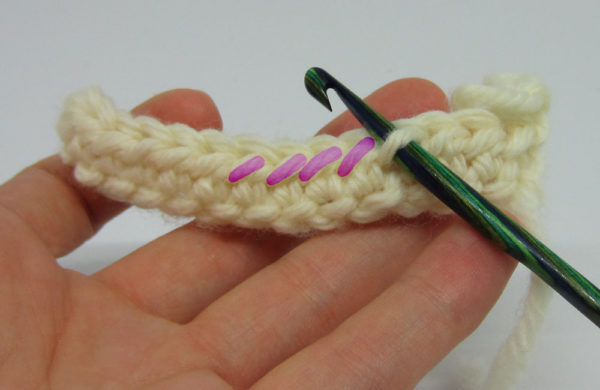
The next image shows the hook inserted in the horizontal loop. Continue hdc through these horizontal loops, and you will create the ribbing, it’s that easy!
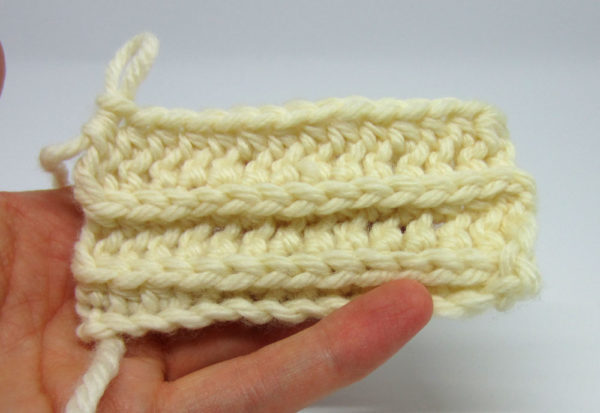
You won’t really start to see the ribbing effect until after a few rows, and it tends to look strange on a short piece (like the swatch below). So don’t give up on it too soon! It really is a simple and beautiful stitch, especially for a scarf.
Making the Scarf
Once you have the hang of the ribbed half double crochet stitch, making a scarf is a lot of fun. The scarf is worked up lengthwise, so the length of the starting chain determines the length of your scarf, and the number of rows determines the scarf’s width. I’ll walk you through how to figure out how long your starting chain should be.
**If you don’t want to calculate and don’t care about the exact length of your scarf, just make a chain wide enough that you can hold it in both hands and stretch your arms wide. Then, add 10-20 more stitches, and start crocheting your scarf!
Yarn
You can use any size yarn, but I recommend not using special fuzzy yarns because they will hide the ribbing – this stitch looks best with a standard yarn. I’ve used cotton, wool, acrylic, and more, and all have worked well, just not fuzzy yarns.
Hook
I recommend a hook that is a size smaller than you would typically use with your yarn – the ribbing turns out best when the stitches aren’t too loose.
First step: Crochet a swatch
The best way to calculate how many stitches you will need is to start by crocheting a swatch. To create a swatch, chain 15 stitches. Complete 5 rows of the half double crochet ribbed stitch.
Measure the 10 stitches in the middle of the swatch and write this measurement down. You will use it to calculate the number of stitches needed to complete the scarf.
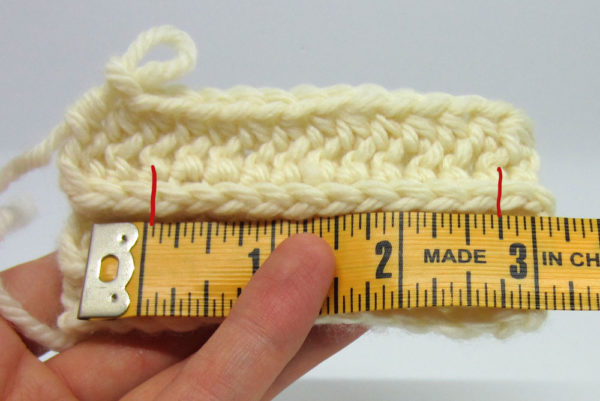
The swatch I created measures about 2.75 in. for each 10 stitches.
Determine the length of the chain
Now we need to use our swatch measurement to determine how many chains to make to get the desired scarf length. Between 6-8 feet (183-244 cm) is usually a good length. I’ll shoot for 6 feet for this example. First, I’ll convert that to inches. There are 12 inches in a foot, so my 6 foot scarf will be 72 inches.
So how many 10-stitch segments does it take to reach 72 inches? Here’s a simple formula:
Scarf Length / Swatch Measurement = X
Plugging in my numbers I get:
72 in. / 2.75 in. = approx. 26
So I will need 26 10-stitch segments to complete the scarf. In other words, I will need 260 stitches.
The width
Just keep adding rows until you like the width of your scarf. Not sure what width a scarf should be? Between 5 – 7 inches (12-18 cm) is usually a good standard size.
And you’re done! No finishing off needed.
I love using this stitch for scarves, but it’s also beautiful for blankets. I’m sure there are other applications as well, play around with it and let me know what you come up with! Also, if anything is unclear, feel free to ask for some help or clarification. Thanks for reading 🙂
Its so pretty!!!
Just a follow-up: I finished the scarf & it’s gotten SO many compliments wherever I took it to work on it. I did it in Lion Brand Jiffy & used 1 size smaller hook than what the label recommended. I stitch a bit tight so that size made the drape just right while still seeing the ribbing.
I also used chainless foundation dc’s to star it & dc to finish. It looks nice even if I do say it myself. =D
Thank you, again!
Hi! I found your stitch last night & I did a trial run this morning & it’s BRILLIANT! I liked it so much I’ve posted this URL to the photo I took of my sample piece.
To those trying this for the first time, I’d suggest you use acrylic worsted, the cheapest stuff you can find. The yarn is pretty solid & it gives you a better idea, I think, of how the strands lie.
I also tried the chainless foundation with which I wasn’t too happy but that may be my doing it wrong. The point is that as soon as I turned the first row of hdc over, I saw RIGHT AWAY the loop I was supposed to hook through. Only blind could I have missed it! Not only that but I also managed to figure out how to start & finish each row. Wish I could post a vid or a photo for you .. I guess my best advice, however you do it, is to remain consistent, as you, Jenn, suggest in an earlier post.
Thanks for the GREAT stitch & clear instructions! To those having trouble, don’t overthink it! It works, even from the first row.
Do you remember, by chance, the place you found the chainless foundation info on? :O)
Hi,this scarf looks so nice! I’ll try it for my husband. I thought before this, trying a tunisian stitch scarf, but it would take me forever, the same as knitting.
I found a pattern that uses this modified hdc, at bernat, and there is a drawing showing exactly the place to insert the hook. It helped me clarify, as well as the pictures above. They call it simply Men’s scarf. Thank you!
I absolutely love this design! I’ve been trying to find a design for a ribbed scarf that doesn’t involve knitting. Do you have a certain way of tying it off at the end?
Hi Ame, glad you like the scarf 🙂 No, I dont’ have a special technique for tying off, I just tie off as usual, and weave the loose end back into the scarf.
Thanks for the beautiful pattern. You make it so easy. I am an avid crocheter and plan to make this for my granddaughter with a few small changes. I was wondering if you had ever used a chain less foundation with this pattern. It would give the bottom row a much more stretchy edge. I am going to try it this way. I think if this method is used the beginning row and the ending row would look more alike. I plan to use an acrylic yarn and therefore no blocking will be necessary. Very washable for a seven year old. Maybe a hat to match. Will be easy with this pattern and a pom pom at top. Thank you so much for making this so easy with your great directions.
Pat, I’ve never seen the chainless foundation before, googled it, and that is perfect!! Thank you so much for the idea! I have fought so much trying to find the happy medium between tight neat chains, and loose ones that have some stretch, and this seems to be the answer to give me both—a very neat finish, AND comfortable stretch. I can’t wait to try this!! And when I start updating my blog and more regularly, this will definitely make its way into one of my posts, such a fantastic technique!
Just found this today while looking on pinterest. I started a scarf with the chain less foundation row using lion brand tweed stripes woodlands. I did the chain less foundation until it was about 2 yards long. It is looking wonderful. It is a great stitch and I am sure I will be using it frequently. Most do the lapghans I make for family I just wing it on the with and pick a stitch I like and go for it. Thanks again for sharing.
The pictures in step 2 are to clarify what I mean by the gap and extra loop. The ‘gap’ is just where you normally insert the hook. Gap may have been a bad choice of word. The extra loop is highlighted in purple in one of the pictures. Hope that helps!
Hi, I like the design…I just dont get the number 2 instruction. what gap and extra loop? :> Thanks!
Thank you Jenn for that bright idea i really2x like it.
That crochet pattern fits for my beanie. Thanks a lot. Godbless and take care..
Hope that you’ll discover more crochet patterns.. ^_^
::Philippines::
Looks great – really enjoy making this one. I started with 161 chains for my scarf, next time will go for more like 200. Thanks so much for sharing this technique!!
EXACTLY what I was looking for…can’t wait to get started. I am almost ready to launch my blog and would love to provide a link to this tutorial.
i’m sorry but i don’t completely understand the stitch… do you just do 1 row of chain (to the legnth you wish) and then you hdc 2 rows on top of that and then anoter chain??
and also i don’t understand how you have said that you get the loop under the one you usually do? could you please explain that a bit further for me.”Thankyou so much for a beautiful stitch, i am very excited to see how it turns out! thanks.
Hi Jo,
You chain the first row to the desired length (though the length usually changes after you’ve crocheted a few rows, so be aware of that)
After that, you hdc one row, then hdc every additional row, except you hdc through the ‘extra loop’. I’ve highlighted the extra loop in purple in one of the pictures, hopefully you can figure it out, good luck!
and does it matter how tight you make the stitches? can you do them tight and the scarf still turn out flimsy like the photo shows?
sorry for all the questions! thanks again. 🙂
Hi Tess,
I crochet the stitches with a smaller hook than I would for normal crocheting. What I love about this stitch is how it can achieve a neat knit look while still having nice drape. A lot of crochet stitches are stiff and bulky, but this ones thin and drapy, perfect for scarves 🙂
I crochet pretty fast and the scarves I’ve been making aren’t too long, so it takes me maybe 3 hours to make a scarf like pictured.
Hi, i haven’t been crotcheting for too long, but i was just wondering… How long di it take you to make this scarf?
Thanks for the great pattern! 🙂
Hi! I was perusing sites to find a nice stitch for a scarf and I came across yours. It looks so lovely that I decided to use it. After my first row of double half crochet stitch, I began the next row of double half crochet but going under the loop as you instructed above. What I began to notice was that as I was going along stitching, I was leaving behind a crazy coil. Even when I was stretching what I had stitched to make it look straight, it coul not get straight and looked ruffled on the very first stitches that I has begun with. Is this what it’s suppose to look like or did I do something wrong?
It sounds like the starting chain is what’s ruffling, is that right? If so, try crocheting into the bottom loop of the chain all the way across, instead of the top loop. And also don’t chain too loosely. It’s hard to explain what I’m saying without pictures, but hopefully that can help.
Hi! I am late to the party, hee, but wanted to tell you I stumbled onto your tutorial a few weeks ago and was so excited to see this! I have been learning to crochet the past year and am loving it and decided to branch out and try knitting. It’s not going as well! I wanted to make knit scarves for gifts but my tension and gauge still aren’t up to gift giving yet so when I saw this pattern I was so excited! For some reason I am getting the hang of crochet better and quicker than knitting. I finally got to start this scarf last night and woo hoo – it is so much fun – this is turning out great! I read through your comments section too and that was very helpful for me. I don’t always understand instructions very easily (its me not the patterns!) but just like you said – keep with it and the ribs show up – love how it looks knitted!!!! I am so excited to have this coming out! Can’t wait to make more for gifts! I will finally be ready for the holidays early this year with fun gifts – thank you so much for posting this and sharing!!! Love it! Hugs to you!
Hi,
I don’t understand the stitch. Could you show the dummy method please.
Thank you.
I am an experience crocheter, and wanted to drop a line or two to say that this is one of the best tutorials I’ve seen… so easy to follow along. Thank you for sharing!
Found this scarf through Tipnut, and as a beginner crocheter I had some difficulties the first time through the HDC (I made a randomly beautiful curled scarf :), but after stepping away from it to work on double stitch the instructions about the ‘extra loop’ became much clearer. It came out so nice I’m actually thinking of gifting it, thanks!
I like the effect of this half double crochet with this scarf as well, I have made a scarf single crochet-in the back loops only, I believe they call this bosnian crochet. I am interested in using the half double crochet version to make a scarf for my daughter. Thanks for sharing….Elizabeth
I must be missing some of your instructions. After I make my row of chains do I just turn the row & start the half double croceht in the first chain stitch? Then at the end of every row do I chain any stitches & turn & what stitch do I start the next row in?
Hi Janice, everything is half double crochet. But instead of half double crocheting where you normally would, you half double crochet in the extra loop i highlight in the instructions. At the end of each row, you just chain 1 and turn. The tutorial is really for the ribbed stitch, and not an entire pattern, which is why the instructions might feel a bit incomplete.
I am a bit confused, in one of your replays you state you should crochet in the bottom loop, but in another reply, you say to crochet in the front loop instead of the back loop. I probably didn’t read this right, but I have read it several times and don’t know what to do.
Thanks.
Sorry to confuse you! I’m not sure which comments you’re referring to, but for the 1st row, it’ll look best if you crochet in the bottom loop of your chain, instead of the top loop which you probably normally would. For the rest of the rows, you should half double crochet in the extra front loop, and not the back loop. Hope that helps clear things up 🙂
Just finish making this scarf and love it but need to know how you do the last row to get it to look like the first row.
I half double crochet the last row. You can do the last row a bit tighter than the others, and it should have a nice finished look.
I have just finished making this scarf and love it but can you tell me how you end the last row whether you put a chain on the last row or just exactly how you finish it off just don’t know how to get it to look like the first row when starting.