
Knitted scarves are beautiful and soft, but a crocheter wants to crochet! Crochet is faster than knitting, and is great for producing nice chunky stitches. But too often, crochet scarves turn out awkward and stiff, lacking the nice drape and softness of knit. Determined to make a warm, soft, beautiful crochet scarf, I set out on my quest to find the perfect way to crochet a scarf.
I experimented with a lot of stitches to find one that would look nice (on both sides of the piece, because who wants a one-sided scarf?), would feel nice (not too dense, and with soft and smooth stitches), and that would work up quickly.
What I finally settled on is this beautiful ribbed variation of a half double crochet stitch. I love the look and feel of scarves made using this stitch.
Here’s how it’s done:
Start with a row of half double crochet (hdc).

The following rows will all be worked in the ribbed hdc variation. The only difference between a normal hdc and the ribbed variation is with where you insert your hook. Hdc stitches create an extra horizontal loop below the ‘V’ where you would normally insert your hook. To create hdc ribbing, you will insert the hook through that extra loop instead of through the V.
Some pictures to help:
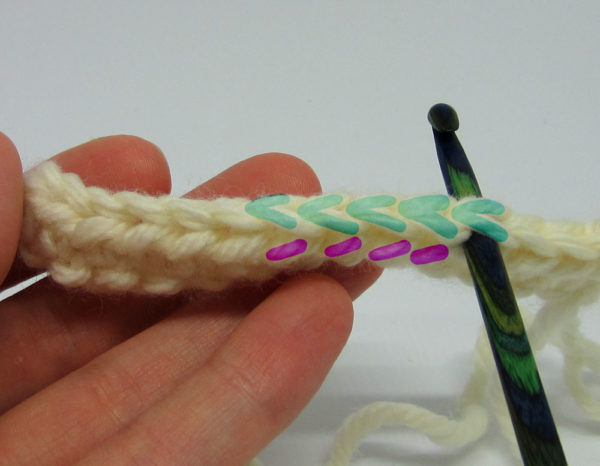
The image below shows the hook inserted through the V, like a normal hdc. This is not how you will complete this stitch.
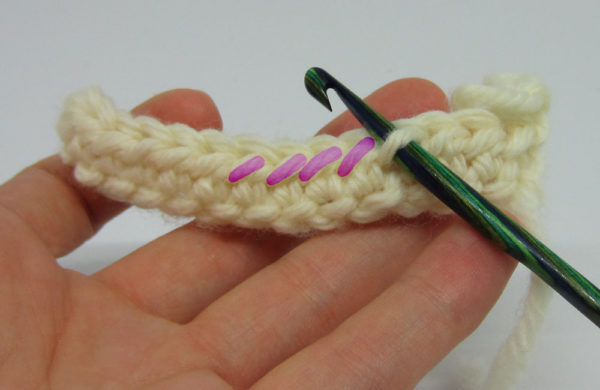
The next image shows the hook inserted in the horizontal loop. Continue hdc through these horizontal loops, and you will create the ribbing, it’s that easy!
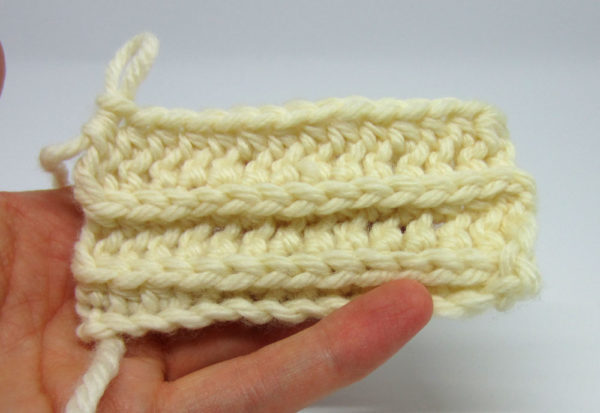
You won’t really start to see the ribbing effect until after a few rows, and it tends to look strange on a short piece (like the swatch below). So don’t give up on it too soon! It really is a simple and beautiful stitch, especially for a scarf.
Making the Scarf
Once you have the hang of the ribbed half double crochet stitch, making a scarf is a lot of fun. The scarf is worked up lengthwise, so the length of the starting chain determines the length of your scarf, and the number of rows determines the scarf’s width. I’ll walk you through how to figure out how long your starting chain should be.
**If you don’t want to calculate and don’t care about the exact length of your scarf, just make a chain wide enough that you can hold it in both hands and stretch your arms wide. Then, add 10-20 more stitches, and start crocheting your scarf!
Yarn
You can use any size yarn, but I recommend not using special fuzzy yarns because they will hide the ribbing – this stitch looks best with a standard yarn. I’ve used cotton, wool, acrylic, and more, and all have worked well, just not fuzzy yarns.
Hook
I recommend a hook that is a size smaller than you would typically use with your yarn – the ribbing turns out best when the stitches aren’t too loose.
First step: Crochet a swatch
The best way to calculate how many stitches you will need is to start by crocheting a swatch. To create a swatch, chain 15 stitches. Complete 5 rows of the half double crochet ribbed stitch.
Measure the 10 stitches in the middle of the swatch and write this measurement down. You will use it to calculate the number of stitches needed to complete the scarf.
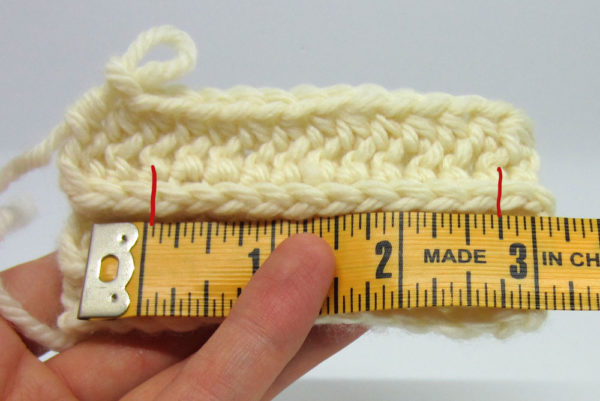
The swatch I created measures about 2.75 in. for each 10 stitches.
Determine the length of the chain
Now we need to use our swatch measurement to determine how many chains to make to get the desired scarf length. Between 6-8 feet (183-244 cm) is usually a good length. I’ll shoot for 6 feet for this example. First, I’ll convert that to inches. There are 12 inches in a foot, so my 6 foot scarf will be 72 inches.
So how many 10-stitch segments does it take to reach 72 inches? Here’s a simple formula:
Scarf Length / Swatch Measurement = X
Plugging in my numbers I get:
72 in. / 2.75 in. = approx. 26
So I will need 26 10-stitch segments to complete the scarf. In other words, I will need 260 stitches.
The width
Just keep adding rows until you like the width of your scarf. Not sure what width a scarf should be? Between 5 – 7 inches (12-18 cm) is usually a good standard size.
And you’re done! No finishing off needed.
I love using this stitch for scarves, but it’s also beautiful for blankets. I’m sure there are other applications as well, play around with it and let me know what you come up with! Also, if anything is unclear, feel free to ask for some help or clarification. Thanks for reading 🙂
i think you meant “that special thing”
Forgot to add a picture.
I noticed a lot of questions about number of stitches, etc., so thought I would share what I did and the measurements of the finished scarf in case it might help someone. I used Bernat Softee Chunky, #6 super chunky, 3.5 oz. (100 g), 108 yds. (99 meters) in Faded Denim. I used just under 2-1/2 skeins to complete a 6” x 73” scarf. I used a U.S. K crochet hook and chained 184.
I was a bit confused myself about how to work each row, was it alternate rows of faux rib and hdc or all faux rib? After looking at pictures of the finished scarf, it became clear the pattern was one row of hdc then all faux rib rows after that. At the end of each row, I tried to find the front st, but if I couldn’t see one, I just did a hdc in the end somewhere where it looked even. After that, I turned my work, chained one, then hdc in the first stitch and worked to the end of the row. Hope this helps.
I love this pattern so much, I think it will make a great baby blanket.
i dont understand?
Thanks for your explanation 🙏🏽
[…] Source: http://seejenndo.com/2017/09/crochet-ribbed-scarf-its-like-knitting-only-better/#more-120 […]
[…] 41. Hot Crochet Ribbed Scarf […]
[…] 41. Hot Crochet Ribbed Scarf […]
I’m confuse after you chain then do a row of hdc across turn then what do you go in back loop only across for the rest ?? Or under the previous row ? Is it all ribbed stitch no hdc??
One row hdc then one row under going back kep doing that I think
I have just started crocheting. How do you transition to the next row?
This is a beautiful pattern once finished. The reversible nature makes it most practical unlike other one sided scarfs
Thank you very much for sharing the details of this scarf!
Such a fun pattern! Thank you for sharing it, I’ve been at a loss as to what to do with all my yarn, and this was perfect!
Thanks so much for this pattern and info. I used this rib pattern to make a rug but didn’t realize it was a fun pattern. You really made this pattern clear. I loved your pictures. I will use the pattern for scarf for a good friend who really needs the warmth. Thanks again. Sherrie McAllister
More details…I will be using a special 3 ply yarn.