Pattern – Small Rosette

October 25, 2010 by Jenn

Flower Baby Ballet Flats

Originally when I decided to try and attach some pretty flowers to my booties, I went to the library to search for some flower patterns. I found an entire book on crochet flowers, but surprisingly, none of them was quite what I wanted. So I started searching online. The technique for most that I liked was the same, but depending on the size and number of petals, and the type of stitches used, the look greatly varies. I experimented a lot and came up with what I think is the perfect little rosette to attach to my little baby booties:

Small Rosette Crochet Flower Pattern

And best of all, the pattern is included in today’s post!

I like to use fingering weight yarn, the stuff used for socks, and a c2 (2.75mm) size hook, for extra snug little stitches. You can really use any yarn and hook you like, but I think the fingering weight gives the petals a nice delicate look to the petals, and snug (a bit tight) stitches hold the whole shape together nicely.

and FYI:

sc=single crochet

dc=double crochet

ch=chain

Ok let’s get started….
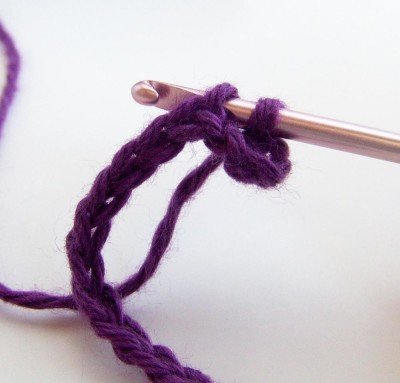
1. Chain 27

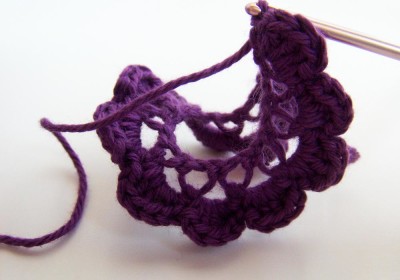
2. Skip first 4 chains, sc in 5th ch from hook, and (ch2, skip 1ch, 1sc) accross

Small Rosette Crochet Flower Pattern

Small Rosette Crochet Flower Pattern

Small Rosette Crochet Flower Pattern

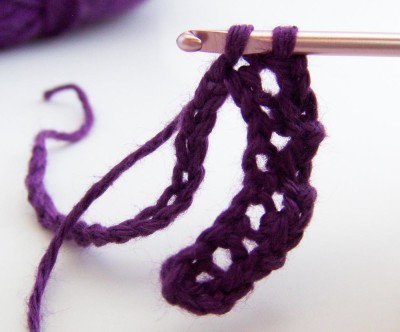
3. Turn piece. (sc, ch1, 3dc, ch1, sc) in each ch2 space accross (as well as the final ch 4 space).

Small Rosette Crochet Flower Pattern

Small Rosette Crochet Flower Pattern

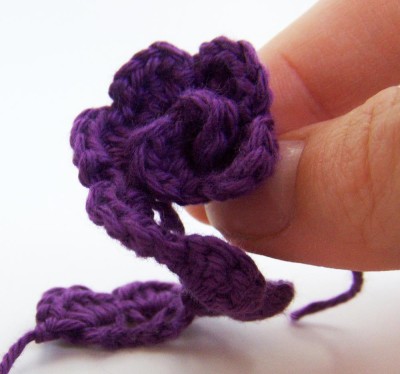
4. That’s all of the crocheting. Finish off, leaving a long tail, and threading the tail through a needle (the tail will be used to sew it all together).

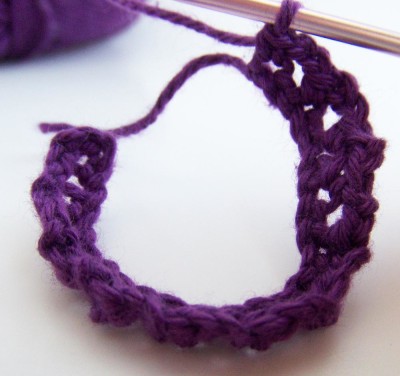
5. Now, holding the short beginning tail in your hand, begin to turn the piece to form your flower.

Small Rosette Crochet Flower Pattern

Small Rosette Crochet Flower Pattern

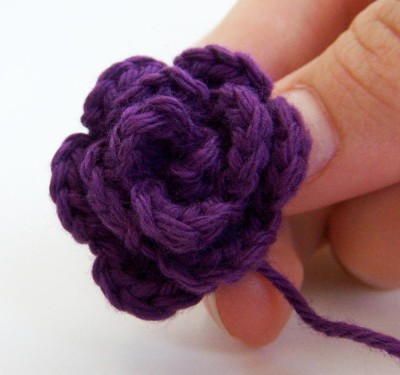
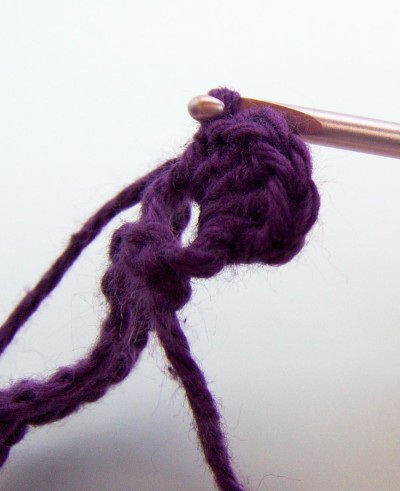
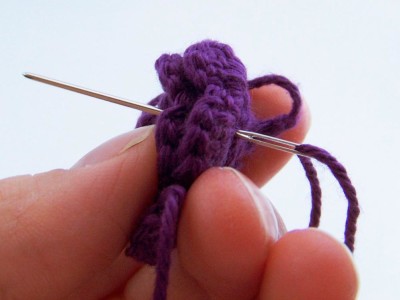
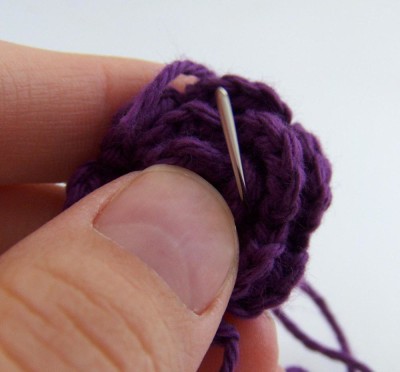
6. Last step, sew the petals together using your long tail and needle. Keep your stitches at the base of the petals, and start with the 2 outer layers. Stitch them in a few places around the flower. Then put the needle through the entire flower a few times in a few different areas to capture the inner petals as well.

Small Rosette Crochet Flower Pattern

Small Rosette Crochet Flower Pattern

Check to make sure everything is secure, and that’s it! A sweet little rose!

Here’s the pattern again, without all the images:

1. Ch 27

2. Skip first 4 ch, sc in 5th ch from hook, (ch2, skip 1 ch, sc) accross.

3. Turn piece, (sc, ch1, 3dc, ch1, sc) in each ch2 space accross, and also in ch4 space at the end.

4. Finish off, leaving a long tail, and threading tail through a needle.

5. Form flower by holding short beginning tail and turning the petals around.

6. Using the long tail, sew petals in place, beginning with outer 2 layers of petals, and finishing with a few stitches to hold all layers together.

This pattern can be adapted in all sorts of ways. Add extra chains to step one for additional petals. Use more chains and skip more stitches in step 2 and you can crochet larger petals in stage 3. There are many possibilities, I’ve had fun (and some frustration) exploring those possibilities myself.

One note if you decide to experiment: if you have a larger number of petals, it will be much better to ‘sew as you go’ rather than just sticking the needle through the center to attach the petals together.  The flower will turn out prettier and more secure if you stitch every couple of petals as you wrap the petals around. I will show you exactly what I mean later when I add more flower patterns. Hopefully that will be before long!

That’s it for today. Let me know what you think!

My Flower Baby Ballet Flats are on sale now on Etsy: http://www.etsy.com/shop/JennOzkan
Bootie Patterns are hopefully soon to come to my Etsy shop, please let me know if you would be interested in that as well.

Leave Comment 63 comments

  1. Sara said:

    I just tried this out and it worked great. I used thicker yarn, as I didn’t have a small crochet hook, next time I will have to try it with finger weight yarn. It’s a great little tutorial THANKS!

    Reply
  2. Joy said:

    This was perfect! Exactly what I was looking for and the pattern was so easy to follow. I used cotton yarn with a F hook. I used it as a topper for a stack of washcloths that I made for my mom. I know I will use it again! Thanks!

    Reply
  3. Jenn said:

    The pattern is my own, I am in the process of preparing it for sale in my Etsy shop. So glad you like it :)

    I hope the flower pattern works well for whatever you need, thanks for commenting :)

    Reply
  4. Britiney said:

    Jenn, I absolutely love your little bootie pattern. I’d love to make some for my baby niece (on the way). If you make the pattern available, please let me know!!! I’ll definitely be giving the flowers a try soon.

    Reply
  5. sandra said:

    Thanks for sharing this lovely rose pattern. It was just what I was looking for for something different on my cards !! Great tutorial.

    Hugs, sandra xx

    Reply
  6. Lisa Bianchi said:

    Thanks for sharing this lovely rose pattern! I also would love to purchase the bootie pattern when it is ready! i do have a question about where you purchase the fingering weight pima cotton? All I have been able to find here where I live is that cheap scratchy worsted weight stuff :( If you could direct me to a on line store or brand I would be ever so grateful! Thanks!!!

    Reply
    • Jenn said:

      knitpicks.com is where I get all my yarns. I discovered it a couple years ago, it’s the best quality AND cheapest yarn I’ve found; since I discovered it, I haven’t gone back to the craft store, I definitely recommend it!

      Reply
  7. Judy said:

    What a cute flower! Made several this afternoon in different colors. This is one pattern I’ll use over and over. Thanks!

    Reply
  8. Pingback: Romatic Shabby Chic Jarred Votive

  9. Anonymous said:

    Love love love the pictures. I’ve never crochet anything and want to make a little rug of sewn flowers. Is there any way to make these a few inches larger in diameter?

    Thanks!!

    Reply
    • Jenn said:

      If you add extra chains at the start, you can add extra petals, which will make the flower larger. Thicker yarn will also make a larger flower.

      Reply
  10. Marja Rolfes-Lemosn said:

    Dear Jenn, Thank you for the wonderful tutorial!! I so love the booties and would sooooo want to buy the pattern!!!!!!!!!!!! I am in love with the booties! You do a wonderful job!
    I really hope you put the pattern up for sale !!!!
    xxx
    Dutch Tulip
    Marja

    Reply
  11. janice said:

    Beautiful rosette. Thank you for the wonderful free patterns. It is so very gracious and generous of your talent and knowledge. I have a question: what is fingering weight yarn? Is there another name for it? Thanks so much,
    Janice

    Reply
    • Jenn said:

      I think fingering weight is a standard weight for knitting socks, I’m not sure what else it might be called though. For the rosettes the weight isn’t very important though, you can just pick a thin yarn that you like, and use tight stitches. You can use thick yarns too, just gives it a different look.

      Reply
  12. Emily said:

    Lisa-
    take your scratchy yarn, loosen up the ball, wash it in a delicates bag (like a lingere bag) wash it in cold water then dry in the bag med heat. scratchy yarn turns into soft yarn!

    Reply
  13. Sam said:

    I love this pattern! The booties, too- would love to get the pattern. You have some great stuff here! Would you mind if I linked your site to my blog?

    Reply
  14. Janet said:

    Thank you Thank you Thank you. I have been looking for a smaller rose pattern to put on baby hats. Your pattern was perfect.

    Reply
    • Jenn said:

      Hi Tammy

      I am selling the pattern in my Etsy shop, but right now it’s taken down because I’m adding some improvements. It should be back up in the next week or so.

      Reply
  15. Melissa said:

    Hello! Just wanted to drop a note to let you know I used your flower on one of my projects. I wanted a fairly easy, small, pretty flower, using #10 thread, and saw that yours is very pretty done with yarn, I thought I would give it a shot!

    Turned out PERFECT! Perfect size and ohhh so pretty! I have linked your page here in my project notes so I dont loose it!

    You can see a photo of the flower on my project here: http://www.ravelry.com/projects/lissaplus2/snood-2

    Thank you again for your time of putting this down on virtual paper!

    Reply
  16. Miranda said:

    Hi Jenn, I was just wondering if you’re ever attempted this flower with 2 different colors? I saw a flower similar to this once but it had 2 colors (one looked like maybe it was the top stitches?) but there was no pattern available. I love the look of this one, and think I will attempt it, but was wondering if you had tips to add the second color? I’ve only be crocheting for about a month, but love it :) I want to add this flower to a hat I did for my niece.

    Reply
    • Jenn said:

      Hi Miranda, I haven’t made this flower with 2 colors before. I’m not sure if that would work with this particular flower. If you have a link to the multicolor flower you saw, I’d like to see it, sounds interesting!

      Reply
      • Jenn said:

        Oh how pretty! I have actually experimented with something similar, but I never finished developing it. But if you created my flower, and then added another row of single crochet using another color across the top of each petal, that might achieve something similar. You’d need to experiment with it a bit, if you do try, let me know how it turns out!

  17. Verdeceladon said:

    Best flower tutorial I’ve come accross, just finished my first one and it couldn’t be easier to follow. Many thanks from Spain!

    Reply
  18. Pingback: Poncho | allison craftland

  19. Pingback: crochet: egg cozies | Ieva Melgalve

  20. Joy said:

    Hi. Sweet pattern. FYI. if you rollthe flower up the opposite way it makes more of an open flower. Ive been crocheting these for ages but never see that part posted up.lol. ;-p
    have fun crocheting away!

    Reply
  21. Pingback: 15 Beautiful (and Free) Crochet Flower Patterns

Leave a Reply

Your email address will not be published.

You may use these HTML tags and attributes: <a href="" title=""> <abbr title=""> <acronym title=""> <b> <blockquote cite=""> <cite> <code> <del datetime=""> <em> <i> <q cite=""> <strike> <strong>